If you’re starting out as a designer, one of the most confusing aspects of computer-based graphic design is the difference between RGB and CMYK color modes, as well as the difference between various file formats.
Although this subject is brought up countless of times in the design blogosphere, We believe it was never explained in a way that’s simple, easy to remember and most importantly, easy to work with.
So here we go.
Understanding and using the RGB color model
Simply put, RGB color model is a technology for mixing (R)ed, (G)reen and (B)lue light in order to produce any imaginable color. This technology and color mixing process is used by all computer screens and electronic devices.
How this truly works is beyond the scope of this article. In short, your computer screen, laptop, cellphone and most other electronic devices are small miracles capable of showing millions of colors just by mixing various intensities of red, green and blue light.
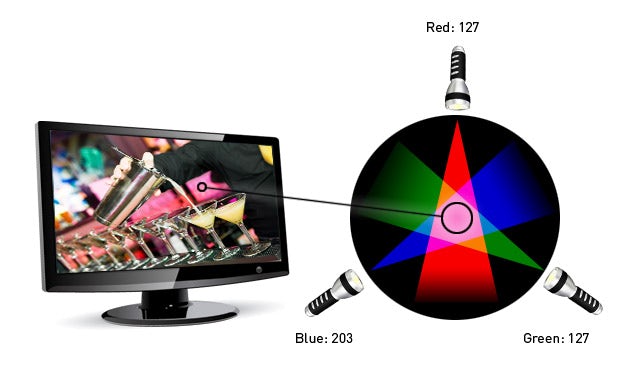
As a designer, you have direct control over this process because you can manually adjust the RGB intensity of each pixel in order to get the color you want — the higher the values, the brighter the colors (just like turning on more lights gives you a brighter room).
You should always design in RGB color mode if your final artwork is going to be used on computer screens or digital devices. This includes:
- user interfaces
- websites
- web banners
- icons
- any other design piece intended for electronic use
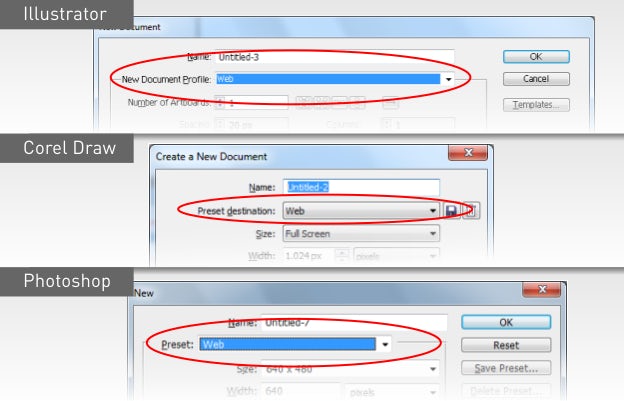
Check if your document is properly set up for RGB work
When creating a new file, make sure that the new document window shows proper settings:
- For Illustrator: select “Web” in the New Document Profile dropdown
- For Photoshop: select “Web” in the Preset dropdown, then make sure the resolution box shows 72
- For CorelDRAW: select “Web” in the Preset destination dropdown
Deliver final RGB files to client
While JPEG is the format of choice for submitting design entries, the final RGB files should be delivered according to this checklist:
- Website layouts: PSD (zipped)
- User interfaces: PSD (zipped)
- Icons: PNG (include original PSD or AI file if requested by client)
- Web banners: PNG, GIF (include original PSD or AI if requested by client)
Never use TIFF, EPS, PDF or BMP file formats to deliver RGB artwork, as they serve a completely different purpose.
The world of CMYK printing
Using RGB is great if your design will be used on screen but if there is even the slightest chance of your artwork is being printed, you need to create files in CMYK color mode.
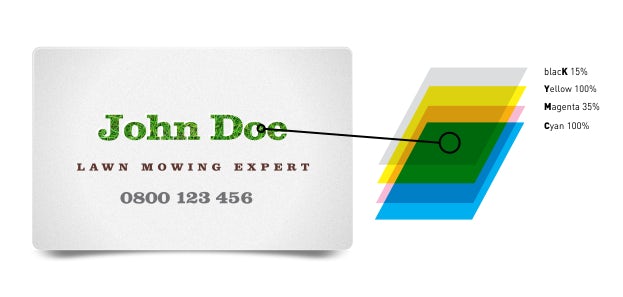
Unlike computer screen, a printer cannot use light to paint colors on paper, which is why it has to use the next best thing — plain ole’ ink.
All desktop and professional printers mix four different ink colors — (C)yan, (M)agenta, (Y)ellow and (K)ey (Black) which is abbreviated as CMYK. These four colors can be mixed together in varying amounts and produce thousands of different shades and hues on paper.
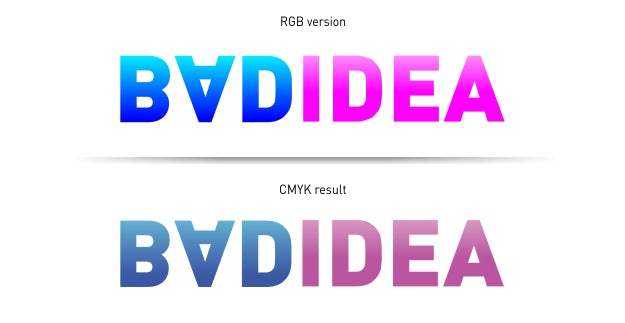
But as you can imagine, mixing CMYK inks is very different than mixing RGB lights. For example, if more lights are added to RGB it produces brighter colors where as adding more ink in CMYK produces darker colors. In RGB, White is defined with the maximum value of each color channel (R:255,G:255,B:255), while in CMYK mode it’s defined as a complete lack of color (C:0%,M:0%,Y:0%,K:0% ).
RGB can give you very bright and nice colors (after all, it’s a light show) that are impossible to produce using inks. If you forget about this, you might end up with a great online design that looks quite dull when printed.
Luckily, you don’t have to worry about this because your design application can imitate the colors of CMYK printing system and create the appropriate files.
Check if your document is properly set up for CMYK print work
Follow these guidelines when creating documents for print:
- For Illustrator: On the New document window, make sure to select “Print” in the New Document Profile dropdown.
- For InDesign: On the New document window, make sure to select “Print” in the Intent dropdown.
- For CorelDRAW: On the New document window, select “Default CMYK” in the Preset Destination dropdown.
- For Photoshop: On New document window, select RGB as color mode and set resolution to 300 dots per inch. Immediately after that, turn on CMYK color imitation (View > Proof colors).When done, convert your final document to CMYK color mode (Image > Mode > CMYK > Flatten) then save the file under a different name. Use this file to finalize your print design in Illustrator, InDesign or CorelDRAW. Note that you can also create CMYK files right from the start (just pick CMYK mode on the New document window), but this will prevent you from using certain effects and functions.
Why 300 DPI?
Besides CMYK inks, an important piece of the printing world is the image resolution, expressed in DPI or PPI (which stands for Dots Per Inch or Pixels Per Inch, which is the same thing).
Printers are different creatures than computer screens. While computer screens need 72×72 pixels to show a 1×1 inch image (72 DPI), printers need at least 300 pixels for each inch in order to show the image in the same size and quality.
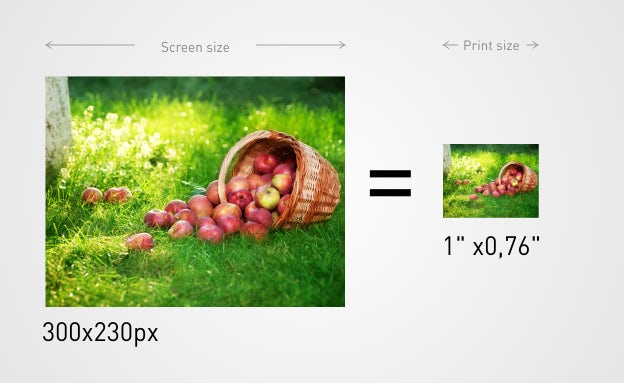
Although it’s quite large on the screen, the image on the left will print well only as 1” x 0.76” thumbnail because quality printing requires at least 300 DPI.
That’s why creating a 10×10 inch image at 300 DPI in Photoshop will give you a file measuring 3,000 pixels in width and height — very large on screen but just 10×10 inches of quality print.
Therefore, always create files at 300 DPI resolution if you intend to print them. Make sure to remember that resizing an existing image to 300 DPI is not an option as it will only duplicate existing pixels and give you a blurry image — you have to create artwork with enough pixels from the very beginning.
If you want to check at which size your existing photos and other artwork can print well, simply divide their pixel dimensions by 300. For example, a 1280 x 1024 pixel photo will print well at 4.26 x 3.42 inches — anything larger than that will make it blurry
Note: you don’t have to worry about DPI for vector objects created in Illustrator or CorelDRAW — they print well at any size. The DPI relates only to bitmap images traditionally handled by Photoshop.
Deliver correct CMYK printing files to client
The industry standard for CMYK file delivery is a properly prepared PDF:
- For Illustrator: Go to File > Save As > “Adobe PDF” from the Save As Type dropdown box. A window will open prompting you to select PDF settings — all you need to do is select “Illustrator Default” from the Adobe PDF preset dropdown box, then hit Save. This will produce PDF file which is both ready for print and editable by Illustrator.
- For InDesign: Go to File > Adobe PDF Presets > Press quality. A window will appear allowing you to adjust many prepress settings, but you can safely hit Export and In Design will create a proper PDF file for professional printing.
- For CorelDRAW: Go to File > Publish to PDF , then pick “Prepress” from the PDF preset dropdown box. This will produce print ready PDF file which can be opened by any Adobe application as well.
In addition to this PDF file, you may export your design to other file formats requested by client (usually EPS or AI), but make sure to communicate that PDF is basically all they need because it can be opened and used by virtually any design software.
Wrapping up
Understanding the difference between RGB and CMYK is an essential piece of design every designer must know.
The bottom line is simple: while RGB uses light to mix colors on screen, CMYK uses ink to mix them on paper. These are very different processes but easily managed by your design application if you create the files with proper settings.
Because they are so different, RGB and CMYK have different file formats for final delivery.